Overview
Labels in Pathwave provide an additional layer of organization and filtering across both the Jobs Planning Board and the Job Board. Partners frequently use labels to categorize jobs based on internal workflows, special requirements, job types, priorities, market segments, or any other custom grouping. Once a label is applied to a job, it becomes available as a filter—allowing teams to sort, group, and streamline their planning and execution processes.
This article explains how to create labels, apply them to jobs, and use label-based filters to build and save custom views.
1. Creating Labels
Labels are created directly in the Pathwave Portal.
Steps to Create a Label
-
Log in to the Pathwave Portal.
-
In the left-hand navigation, select Configuration.
-
Choose Labels.
-
Select +Add Label.
-
Enter a label name.
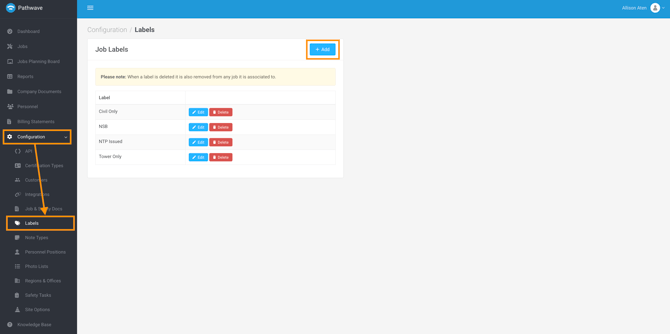
Best Practice: Keep labels concise and standardized so your team can easily understand and adopt them across projects.
2. Applying Labels to Jobs
Once labels are configured, they can be applied to any job from within the Job Overview tab.
Steps to Apply a Label
-
Navigate to the Jobs in the left-hand toolbar.
-
Open the job you wish to update.
-
Locate the Labels field within the job details.
-
Select one or more labels from your available list.
-
Save your changes.
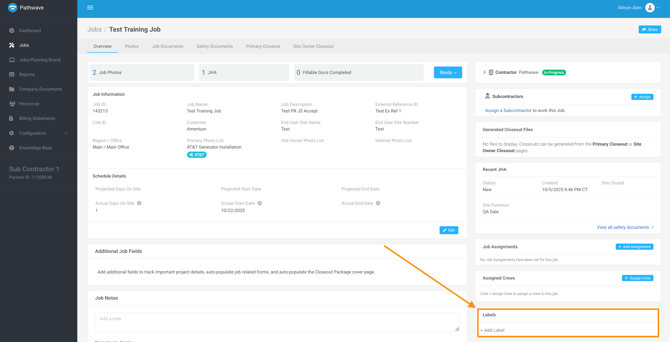
Tip: Jobs can have multiple labels applied. This is especially useful for tracking phases, priorities, market types, or job statuses not covered by other system fields.
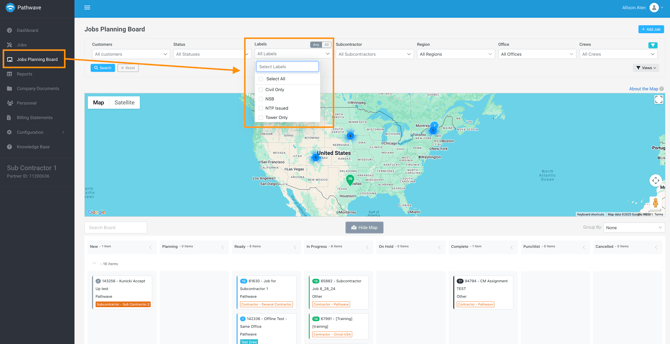
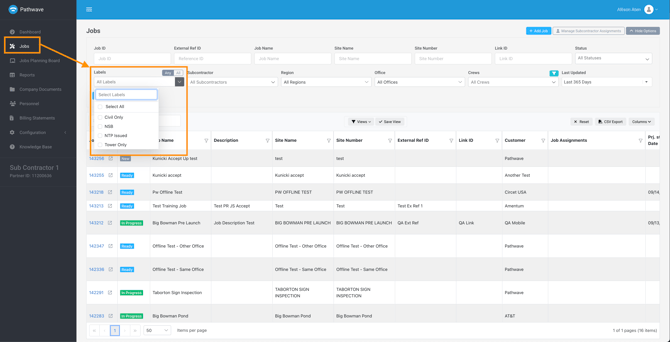
3. Using Labels for Filtering & Sorting
When labels are applied to jobs, they automatically appear as filtering options across the system.
Where Label Filters Are Available
-
Jobs Planning Board
-
Jobs
- Reports > Job Details
How to Filter by Labels
-
Open the Jobs Planning Board or Job Board.
-
Locate the Labels filter.
-
Choose one or more labels to narrow your job list or board view.
Filtering by labels helps teams:
-
Quickly isolate work by category or priority
-
Group similar job types
-
Identify which jobs require follow-up or special handling
-
Support internal workflows with custom tags unique to the partner
Jobs Planning Board:
Jobs:
4. Saving Custom Views
Any combination of filters—including label filters—can be saved for easy access.
Steps to Save a View
-
Apply your desired filters, including labels.
-
Arrange the board or table view as you prefer.
-
Select Save View (top right).
-
Name your view and confirm.

Saved views allow teams to quickly return to frequently used setups such as:
-
Market-Specific Jobs
-
High-Priority Jobs
-
Jobs Requiring Safety Review
-
Jobs Assigned to a Specific Vendor
-
Jobs Tagged for Upcoming Audits
5. Creative Use Cases for Labels
Partners use labels in many ways, including:
-
Marking high-priority or escalated work
-
Identifying project types (e.g., Microwave, LTE, DAS, Fiber)
-
Tracking internal milestones or readiness checkpoints
-
Flagging jobs that need special documentation or QA attention
-
Grouping jobs assigned to subcontractors
-
Identifying SOW-specific deliverables or special instructions
Labels are flexible and meant to support your unique workflow.
Summary
Labels are a powerful tool in Pathwave that enhance job organization and visibility. By creating and applying labels, partners unlock advanced filtering and sorting options across both the Jobs Planning Board and Job Board. Combined with the ability to save custom views, labels help teams streamline operations, support internal processes, and manage projects with greater precision.
If you need assistance configuring labels or designing a labeling strategy that fits your workflow, contact support@pathwave.com